This reindeer ornament was designed by Elijah March, Store Manager of Tandy Leather in Grand Rapids, Michigan. Since starting leatherwork as a teenager, he follows a steady tradition of making leather Christmas gifts for friends and family. Join in on this tradition, too and start with an ornament, and personalize it to make it unique!
Download the pattern here.
Materials:
Shop all materials here.
Instructions:
Step 1. Trace out the pattern
Case your 5-7 oz. leather with water, and trace the pattern onto the leather with a stylus or Scratch Awl.

Step 2. Cut out the pattern
Use the Precision Craft Knife, but make sure it has a new blade. This makes cutting the leather much easier.

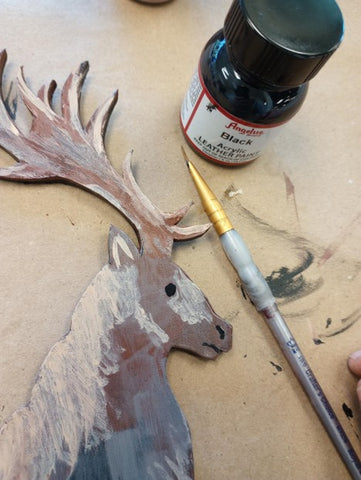
Step 3. Paint it black (on both sides)
Using the Angelus Leather Paints, paint the flesh and the grain sides black.

Step 4. Paint with light brown
Paint the antlers, head, back, chest, and legs with the Light Brown Angelus Paint. Leave the sides and feet black.

Step 5. Paint with the gray taupe
Lightly paint the Angelus Grey Taupe Paint over the brown. After dipping your brush into the paint, wipe it on a piece of paper to remove the excess, then brush the mostly dry paintbrush over the brown, and go a little past it onto the black. Also, accent the antlers to give it some visual texture.

Step 6. Paint with the beige
Paint the tops of the antlers, outline the ears, jawline, and tail. Lightly brush the top of the muzzle, the back of the neck, back, back of the legs and right above the hooves.

Step 7. Paint eyes, nose, and mouth
Using a fine-tip brush and Angelus Black Paint, paint a dot for the eye, and a mark for the nose and mouth.
Step 8. Paint with white
Place the tiniest dot on the forward side of the eye. Also, line the top edges of the antlers, back, stomach and chest in white as well.


Step 9. Punch the holes
Punch the holes where marked on the pattern. The large hole for hanging should be ¼ inch in size.

Step 10. Rivet the lace
You will want to cut a 10 inch strip, a 1 inch strip, and a 3.5 inch strip of Kodiak Lace. The lace is going to wrap around the muzzle, and are going to rivet down on the back. Put the shorter strips on first, but make sure you share the holes where they overlap with the longer strip. Rivet them on with the small domed rivet setter.


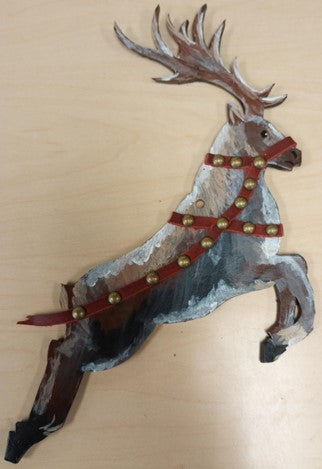
Step 11. Paint the sleighbells
Using Angelus Black Paint and a fine brush, paint two dots on each side of each domed rivet, then connect the dots with a thin black line.


Step 12. Tie the hanging loop
Use your lace to tie a hanging loop. You could also use a ribbon or thick string. Ta-da!

FOLLOW US 📢
Instagram (@tandyleather): https://www.instagram.com/tandyleather/
TikTok (@tandyleather): https://www.tiktok.com/@tandyleather
Facebook (@tandyleather): https://www.facebook.com/tandyleather
Sign-Up For Email: https://tandyleather.com/pages/preference-center


Comments
Leave a comment